Miracle No Knead Bread: The Easiest, Most Delicious Bread You’ll Ever Make
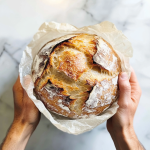
This Miracle No Knead Bread is a game-changer for anyone who loves homemade bread but doesn’t want to spend hours kneading and fussing. With just 4 simple ingredients and minimal effort, you can create a loaf with a crispy, golden crust and a soft, chewy interior. Perfect for soups, sandwiches, or simply slathered with butter, this bread is as forgiving as it is delicious. Plus, it requires no special skills—just time and patience!
- Prep Time: 12 hours
- Cook Time: 40 minutes
- Total Time: 12 hours 40 minutes
Ingredients
Scale
- 3 cups (360g) all-purpose flour
- 1 ½ teaspoons salt
- ½ teaspoon instant yeast
- 1 ½ cups (360ml) room temperature water
Instructions
- In a large mixing bowl, whisk together the flour, salt, and instant yeast.
- Add the water and stir until a shaggy, sticky dough forms. If the dough feels too dry, add 1-2 tablespoons more water. Don’t worry if it looks messy—this is normal!
- Cover the bowl tightly with plastic wrap and let it rest at room temperature for 12-18 hours (overnight works perfectly). The dough will rise, become bubbly, and double in size.
2. Prep for Baking
- Preheat your oven to 450°F (230°C). Place a 6-quart Dutch oven (or similar oven-safe pot with a lid) inside the oven to heat for about 30 minutes.
- While the oven heats, gently scrape the dough onto a well-floured surface. Do not knead it—just shape it into a rough ball using floured hands.
- Place the dough on a piece of parchment paper, cover it loosely with plastic wrap, and let it rest while the Dutch oven heats.
3. Bake the Bread
- Carefully remove the hot Dutch oven from the oven. Lift the dough (with the parchment paper) and place it into the hot pot. Be cautious—the pot is extremely hot!
- Cover the pot with its lid and bake for 30 minutes.
- Remove the lid and bake for another 10-15 minutes, or until the crust is deep golden brown and crispy.
- Transfer the bread to a wire rack and let it cool completely before slicing.
Notes
- Use a kitchen scale for precise measurements, especially for the flour and water.
- Don’t skip the resting time—the long fermentation is what develops the flavor and texture.
- Experiment with flours: Try whole wheat or gluten-free flour (see notes below for adjustments).
- Storage: Keep the bread in a paper bag or wrapped in a clean kitchen towel to maintain its crust. Avoid plastic bags, as they can make the crust soft.
Nutrition
- Calories: 160 per serving
- Fat: 0.5g
- Carbohydrates: 33g
- Fiber: 1g
- Protein: 4g