
Advertisement
Homemade Fudgesicles: The Ultimate Creamy Chocolate Treat
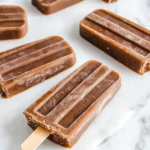
There’s nothing quite like the nostalgic taste of a rich, chocolatey fudgesicle on a hot summer day. These homemade fudgesicles are not only incredibly easy to make but also far superior to store-bought versions. With just a few simple ingredients, you can whip up a batch of these creamy, dreamy frozen treats that will satisfy your sweet tooth and keep you cool.
In this guide, we’ll walk you through the step-by-step process of making homemade fudgesicles, share expert tips for the perfect texture, and explore variations to customize your popsicles. Plus, we’ll answer some frequently asked questions to ensure your fudgesicles turn out perfect every time.
Why You’ll Love These Homemade Fudgesicles
✅ Rich & Creamy Texture – Made with chocolate pudding and milk, these fudgesicles are luxuriously smooth.
✅ Easy to Make – Only 15 minutes of prep time, then let the freezer do the work!
✅ Kid-Friendly – A fun and delicious treat that both kids and adults will adore.
✅ Customizable – Add-ins like nuts, marshmallows, or peanut butter can take these to the next level.
Ingredients for Homemade Fudgesicles
To make these homemade fudgesicles, you’ll need just a few pantry staples:
- 5.9 oz chocolate instant pudding mix (or any chocolate flavor you prefer)
- 3 cups cold milk (whole milk for extra creaminess, but any milk works)
- 10 popsicle sticks
- Popsicle molds (for 10 popsicles)
That’s it! No complicated ingredients—just pure, chocolatey goodness.
Step-by-Step Instructions
1. Prepare the Pudding Mixture
In a large bowl, whisk together the chocolate instant pudding mix and cold milk for about 5 minutes, or until the mixture thickens.
💡 Pro Tip: For an ultra-smooth texture, use a hand mixer or stand mixer to eliminate any lumps.
2. Transfer to Popsicle Molds
Once the pudding is thick and creamy, carefully pour or pipe it into your popsicle molds.
💡 Pro Tip: Using a piping bag makes filling the molds cleaner and easier.
3. Insert Popsicle Sticks
Gently place a popsicle stick into each mold. If the sticks don’t stay upright, freeze the fudgesicles for 1-2 hours first, then insert them.
4. Freeze Until Firm
Place the filled molds in the freezer for at least 8 hours, or until completely solid.
5. Remove from Molds
When ready to enjoy, dip the molds in warm water for 30 seconds to loosen the fudgesicles. Gently pull them out and place them on a parchment-lined tray if storing in the freezer.
The History and Popularity of Fudgesicles
Fudgesicles have been a beloved frozen treat for generations, offering a creamy, chocolatey alternative to traditional ice pops. The concept of chocolate-flavored ice pops dates back to the early 20th century when frozen desserts became more accessible thanks to advancements in refrigeration. The term “fudgesicle” was trademarked in the 1940s, but homemade versions have existed even longer, often made with simple ingredients like cocoa, sugar, and milk.
What makes homemade fudgesicles so special is their rich, pudding-like texture, which sets them apart from typical ice pops. Unlike store-bought versions that often contain artificial flavors and preservatives, making them at home allows you to control the ingredients, ensuring a fresher, more decadent taste. Many people associate fudgesicles with childhood nostalgia, making them a fun and comforting treat for both kids and adults.
Over the years, fudgesicles have evolved with various flavor twists, including swirls of peanut butter, mint, or even caramel. Their versatility makes them a favorite for customization, allowing bakers to experiment with different mix-ins and textures. Whether enjoyed on a hot summer day or as a sweet dessert year-round, homemade fudgesicles remain a timeless classic.
Healthier Alternatives for Guilt-Free Fudgesicles
While traditional homemade fudgesicles are undeniably delicious, some may want a lighter or healthier version. Fortunately, there are several easy swaps to make this treat more nutritious without sacrificing flavor.
One popular alternative is using sugar-free pudding mix combined with almond milk or coconut milk for a lower-calorie, dairy-free option. For an even cleaner ingredient list, you can make the pudding from scratch using cocoa powder, a natural sweetener like honey or maple syrup, and cornstarch as a thickener.
Another great variation is adding protein powder to the mix, transforming these fudgesicles into a post-workout snack. Greek yogurt can also be blended into the pudding mixture for extra creaminess and a protein boost.
For those watching their sugar intake, dark chocolate (70% cocoa or higher) can be melted and mixed into the base, providing antioxidants and a deeper chocolate flavor. Avocado is another surprising but effective addition—it blends smoothly into the pudding, adding healthy fats and a velvety texture.
These healthier versions prove that homemade fudgesicles can be both indulgent and nutritious, catering to various dietary needs while still satisfying that chocolate craving.
Creative Ways to Serve and Enjoy Fudgesicles
Fudgesicles don’t have to be enjoyed straight from the mold—there are countless fun and creative ways to serve them! Here are a few ideas to elevate your homemade fudgesicles into a show-stopping dessert:
- Fudgesicle Ice Cream Float – Place a fudgesicle in a glass and pour cold milk or vanilla soda over it for a creamy, fizzy treat.
- Chocolate-Dipped Fudgesicles – Melt some chocolate and dip the frozen fudgesicles for an extra layer of richness. Add sprinkles or crushed nuts for texture.
- Fudgesicle Sundae – Chop fudgesicles into chunks and layer them with whipped cream, caramel sauce, and chopped peanuts for an ice cream sundae twist.
- Fudgesicle Milkshake – Blend a fudgesicle with milk and a scoop of vanilla ice cream for an ultra-thick, chocolatey milkshake.
- Fudgesicle Cake Pops – Crush fudgesicles, mix with frosting, roll into balls, and dip in chocolate for a unique frozen cake pop.
These serving ideas make homemade fudgesicles even more versatile, turning them into party desserts, fun snacks, or even elegant plated treats. The possibilities are endless—let your creativity run wild!
Expert Tips for Perfect Homemade Fudgesicles
✔ Use High-Quality Chocolate Pudding Mix – The better the pudding, the richer the flavor.
✔ Tap Out Air Bubbles – Lightly tap the molds on the counter to remove air pockets for a smoother texture.
✔ Freeze Quickly for Best Texture – The faster they freeze, the creamier they’ll be.
✔ Store Properly – Once unmolded, wrap fudgesicles in parchment paper to prevent freezer burn.
Delicious Variations to Try
Want to switch things up? Here are some tasty twists on classic homemade fudgesicles:
1. Peanut Butter Swirl Fudgesicles
Swirl in peanut butter before freezing for a chocolate-peanut butter combo.
2. Mint Chocolate Fudgesicles
Add 1 tsp peppermint extract to the pudding mix for a refreshing twist.
3. Rocky Road Fudgesicles
Mix in mini marshmallows and chopped nuts for extra crunch.
4. Dairy-Free/Vegan Fudgesicles
Use almond milk or coconut milk and a dairy-free pudding mix.
Nutritional Information (Per Serving)
| Calories | Carbs | Protein | Fat | Sodium | Sugar |
|---|---|---|---|---|---|
| 98 kcal | 16g | 2g | 2g | 503mg | 4g |
These homemade fudgesicles are a relatively low-calorie treat, making them a guilt-free indulgence!
FAQs About Homemade Fudgesicles
1. Can I Use Cook-and-Serve Pudding Instead of Instant?
Yes, but you’ll need to cook and cool it first, which adds extra time.
2. How Long Do Fudgesicles Last in the Freezer?
Up to 2 weeks if stored properly in an airtight container.
3. Can I Make These Without Popsicle Molds?
Yes! Use small paper cups and insert sticks once partially frozen.
4. Why Are My Fudgesicles Icy Instead of Creamy?
This can happen if the mixture isn’t thick enough or if they freeze too slowly. Using whole milk helps.
The Ultimate Guide to Homemade Fudgesicles (Creamy & Dreamy!)
Advertisement
Satisfy your chocolate craving and keep cool with these rich, creamy, and perfectly sweet chocolate fudgesicles. Made with just two simple ingredients, they’re a delicious frozen treat for kids and adults alike!
- Prep Time: 15 minutes
- Total Time: 8 hours 15 minutes
Ingredients
- 1 (5.9 oz) package chocolate instant pudding mix
- 3 cups cold milk
- 10 popsicle sticks
- Popsicle molds (for 10 popsicles)
Instructions
- Prepare the pudding – In a large bowl, whisk together the pudding mix and cold milk for about 5 minutes, or until thickened.
- Fill the molds – Pour or pipe the pudding mixture into popsicle molds, leaving a little space at the top.
- Insert sticks – Place popsicle sticks into each mold. If needed, freeze for 1-2 hours first to help them stand upright.
- Freeze – Freeze for at least 8 hours, or until completely firm.
- Remove fudgesicles – Dip the molds in warm water for about 30 seconds to loosen, then gently pull out the fudgesicles.
- Serve or store – Enjoy immediately or place on a parchment-lined tray to store in the freezer.
Notes
✔ Use a piping bag for a mess-free way to fill molds.
✔ Tap the molds on the counter to remove air bubbles.
✔ Freeze for 1-2 hours before adding sticks if they won’t stay upright.
✔ Store outside molds after a day to maintain texture and color.
Nutrition
- Calories: 98kcal per serving
- Sugar: 4g
- Sodium: 503mg
- Fat: 2g
- Saturated Fat: 1g
- Carbohydrates: 16g
- Protein: 2g
- Cholesterol: 7mg
Final Thoughts
These homemade fudgesicles are the perfect way to enjoy a cool, chocolatey treat without any artificial ingredients. With minimal effort and maximum flavor, they’re sure to become a summer staple in your home.