
Advertisement
Easy Butterfinger Balls: The Ultimate No-Bake Treat for Candy Lovers
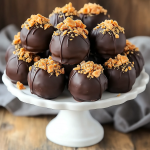
If you’re a fan of Butterfinger candy bars, you’re going to love these Easy Butterfinger Balls! These bite-sized treats combine the rich, crunchy flavor of Butterfinger with creamy peanut butter, all coated in smooth chocolate for an irresistible dessert. Whether you’re looking for a quick sweet fix, a party snack, or a homemade gift, these no-bake Butterfinger Balls are the perfect solution.
In this comprehensive guide, we’ll walk you through everything you need to know about making Easy Butterfinger Balls, including step-by-step instructions, ingredient substitutions, storage tips, and creative variations. Plus, we’ll answer some frequently asked questions to ensure your Butterfinger Balls turn out perfect every time!
Why You’ll Love These Easy Butterfinger Balls
Before we dive into the recipe, let’s talk about why these Butterfinger Balls are a must-try:
✅ No baking required – Perfect for when you want a delicious treat without turning on the oven.
✅ Quick & easy – Ready in under an hour, with minimal prep work.
✅ Crunchy & creamy – The perfect balance of textures.
✅ Great for gifting – Package them in a cute box or tin for a homemade present.
✅ Kid-friendly – A fun recipe to make with little helpers.
Now, let’s get into the details!
Ingredients for Easy Butterfinger Balls
To make these delicious Butterfinger Balls, you’ll need just a few simple ingredients:
Main Ingredients
- 1 cup creamy peanut butter – The base of the mixture.
- ¼ cup unsalted butter, softened – Adds richness and helps bind the mixture.
- 2 cups powdered sugar – Sweetens and thickens the mixture.
- 1 teaspoon vanilla extract – Enhances the flavor.
- Pinch of salt – Balances the sweetness.
- 6 Butterfinger candy bars, finely crushed – The star ingredient!
For the Chocolate Coating (Optional but Recommended)
- 12 ounces semisweet or milk chocolate, chopped – For dipping.
Equipment Needed
You won’t need any fancy tools for this recipe, but here’s what you’ll want to have on hand:
- Mixing bowl – For combining ingredients.
- Electric mixer or stand mixer (optional) – Makes mixing easier, but a spoon works too.
- Spoon or spatula – For stirring.
- Baking sheet lined with parchment paper or wax paper – To set the balls.
- Small saucepan (if melting chocolate on the stove) – For the chocolate coating.
- Fork or dipping tools – For coating the balls in chocolate.
Step-by-Step Instructions for Easy Butterfinger Balls
Step 1: Mix the Peanut Butter Base
- In a large mixing bowl, combine 1 cup creamy peanut butter, ¼ cup softened unsalted butter, 2 cups powdered sugar, 1 teaspoon vanilla extract, and a pinch of salt.
- Use an electric mixer (or mix by hand with a spoon) until the mixture is smooth and well combined.
Step 2: Add the Crushed Butterfinger
- Fold in the 6 finely crushed Butterfinger bars until evenly distributed.
Step 3: Form the Butterfinger Balls
- Line a baking sheet with parchment paper or wax paper.
- Scoop out tablespoon-sized portions of the mixture and roll them into balls using your hands.
- Place the balls on the prepared baking sheet.
Step 4: Dip in Chocolate (Optional but Delicious)
- Melt 12 ounces of semisweet or milk chocolate in a small saucepan over low heat (or in the microwave in 30-second intervals, stirring between each).
- Using a fork or dipping tool, dip each Butterfinger ball into the melted chocolate, coating it completely.
- Tap off excess chocolate and return the coated balls to the baking sheet.
Step 5: Chill Until Set
- Refrigerate the Butterfinger Balls for about 30 minutes, or until the chocolate hardens.
- Once set, transfer them to an airtight container for storage.
Step 6: Serve & Enjoy!
- Serve chilled or at room temperature. Enjoy the crunchy, creamy, chocolatey goodness!
The Cultural History of Peanut Butter Confectionery
The Butterfinger ball represents the culmination of centuries of peanut-based confectionery evolution. Let’s trace this delicious history from ancient times to modern day.
Ancient Origins (1500 BCE – 1800s)
The Incas were among the first to grind peanuts into paste, using stone metates to create primitive peanut butter. Spanish explorers brought peanuts to Europe in the 16th century, where they remained a curiosity until the 1800s when:
- Marcellus Gilmore Edson patented peanut paste in 1884
- Dr. John Harvey Kellogg promoted it as health food
- George Washington Carver developed modern processing techniques
The Candy Bar Revolution (1900-1950)
The early 20th century saw an explosion of peanut-based candies:
- 1920: Baby Ruth introduces peanut-studded nougat
- 1923: Butterfinger debuts with its unique flaky texture
- 1928: Reese’s combines chocolate and peanut butter
These innovations coincided with: - The rise of industrial chocolate production
- Improved peanut cultivation techniques
- Post-WWI sugar availability
Butterfinger’s Unique Place in Candy History
What set Butterfinger apart was its patented “corn flake crunch” process, developed by Otto Schnering of Curtiss Candy Company. This involved:
- Cooking a sugar-peanut butter syrup to 290°F
- Aerating with nitrogen gas
- Rapid cooling to create crystalline structure
The result was a bar that was 37% air by volume – unprecedented in 1923.
Cultural Impact Through the Decades
- 1930s: Marketed as an “energy food” for workers
- 1950s: Became baseball stadium staple
- 1980s: The Simpsons partnership boosted popularity
- 2000s: Reformulation to remove trans fats
Modern Artisanal Revival
Today’s craft chocolate movement has inspired upscale versions of peanut butter treats. Professional pastry chefs are:
- Using single-origin peanuts
- Experimenting with alternative sweeteners
- Incorporating exotic spices
Yet the classic Butterfinger ball remains beloved for its nostalgic appeal and perfect balance of textures.
Advanced Techniques for Professional-Quality Butterfinger Balls
Elevate your Butterfinger balls from homemade to artisanal with these professional pastry chef techniques.
Ingredient Optimization
- Peanut Butter Selection
- For superior flavor: Blend 70% freshly ground Valencia peanuts with 30% commercial creamy
- Toast peanuts at 325°F for 12 minutes before grinding
- Add 1.5% fleur de sel during grinding
- Butter Preparation
- Culture your butter for 36 hours at 70°F
- Clarify and brown for nutty complexity
- Maintain at 68°F before incorporation
Precision Mixing Methods
- Two-Stage Incorporation
- First mix: Cream butter and peanut butter at 65°F
- Second mix: Add powdered sugar in 3 batches
- Final mix: Fold in Butterfinger crumbs by hand
- Temperature Control
- Ideal dough temp: 71°F
- If too warm: Chill in 15-minute increments
- If too cold: Knead briefly to warm
Advanced Shaping Techniques
- Portion Control
- Use #60 scoop (2 tsp) for consistency
- Weigh each portion to 22g ±0.5g
- Roll between polycarbonate sheets for perfect spheres
- Surface Treatment
- Mist with 190-proof ethanol before rolling
- Dust hands with tapioca starch
- Chill shaped balls on anti-grid mat
Professional Chocolate Work
- Tempering Methods
- Seed method: Melt 2/3 chocolate, add 1/3 chopped
- Tablier method: Spread on marble slab
- Maintain working temp within 1°F variance
- Coating Systems
- Enrobing: Use chocolate fork with 3-tine design
- Dipping: Maintain 45° angle entry
- Spinning: Use chocolate wheel for even coating
Finishing Techniques
- Texture Contrast
- Spray with cocoa butter for matte finish
- Dust with freeze-dried peanut powder
- Apply tempered chocolate shards
- Flavor Layering
- Inject 0.5ml bourbon caramel center
- Brush with peanut oil before serving
- Garnish with Maldon salt flakes
Tips for Perfect Butterfinger Balls
✔ Use creamy peanut butter – Chunky peanut butter can make rolling difficult.
✔ Crush Butterfinger bars finely – Larger chunks can make the balls fall apart.
✔ Chill before dipping – If the mixture is too soft, refrigerate for 15 minutes before rolling.
✔ Use high-quality chocolate – For the best flavor and smooth coating.
✔ Add toppings – Sprinkle with sea salt, crushed peanuts, or extra Butterfinger crumbs before the chocolate sets.
Variations & Customizations
Want to switch things up? Try these fun twists on Easy Butterfinger Balls:
1. White Chocolate Butterfinger Balls
- Dip in white chocolate instead of milk or semisweet for a sweeter flavor.
2. Dark Chocolate Coating
- Use dark chocolate for a richer, less sweet option.
3. Peanut Butter Drizzle
- Melt peanut butter chips and drizzle over the chocolate-coated balls.
4. Nut-Free Version
- Replace peanut butter with sunflower seed butter for a nut-free alternative.
5. Extra Crunchy
- Mix in extra crushed Butterfinger for more texture.
How to Store Butterfinger Balls
- Room Temperature: Store in an airtight container for up to 3 days.
- Refrigerator: Keeps for up to 2 weeks.
- Freezer: Freeze in a single layer, then transfer to a freezer bag for up to 3 months. Thaw before serving.
Frequently Asked Questions (FAQs)
1. Can I use natural peanut butter?
Yes, but it may be oilier. You might need to add a bit more powdered sugar to thicken the mixture.
2. Can I use a different candy bar?
Absolutely! Try Crunch bars, Reese’s Pieces, or Heath bars for a different flavor.
3. Why are my Butterfinger Balls too soft?
If the mixture is too sticky, add a little more powdered sugar. If it’s too dry, add a teaspoon of milk or extra peanut butter.
4. Can I make these without chocolate coating?
Yes! They’re delicious even without the chocolate.
5. How do I prevent the chocolate from cracking?
Make sure the balls are at room temperature before dipping, and avoid sudden temperature changes.
Easy Butterfinger Balls: The Ultimate No-Bake Treat for Candy Lovers
Advertisement
When I was younger, my grandma used to surprise us with little candy treats after school. These Butterfinger Balls take me right back to those joyful, carefree days. They’re crunchy, creamy, and wrapped in chocolatey goodness – just like her hugs! Whether you’re hosting a gathering or just need a little pick-me-up, these are a must-try treat. Give them a go and bring a little joy to your kitchen today!
- Prep Time: 20 mins
- Total Time: 50 mins
Ingredients
-
1 cup creamy peanut butter
-
1/4 cup unsalted butter (softened)
-
2 cups powdered sugar
-
1 tsp vanilla extract
-
Pinch of salt
-
6 Butterfinger candy bars (finely crushed)
-
12 oz semisweet or milk chocolate (chopped, for dipping – optional)
Instructions
-
In a mixing bowl, blend peanut butter, softened butter, powdered sugar, vanilla, and salt until smooth.
-
Gently fold in the crushed Butterfinger bars.
-
Line a baking sheet with parchment or wax paper.
-
Roll tablespoon-sized scoops into balls and place on the tray.
-
(Optional) Melt chocolate in a saucepan over low heat or microwave in 30-second intervals until smooth.
-
Dip each ball in the melted chocolate, tap off excess, and return to the tray.
-
Chill in the refrigerator for 30 minutes or until chocolate sets.
-
Store in an airtight container and enjoy chilled or at room temperature!
⏱️ Prep Time: 20 mins
Notes
-
Use room temperature butter for smoother mixing.
-
Want an extra crunch? Add a few chopped roasted peanuts to the mix!
Nutrition
- Calories: 140 kcal per serving
- Fat: 8g
- Carbohydrates: 15g
- Protein: 2g
Final Thoughts
These Easy Butterfinger Balls are the perfect no-bake treat for any occasion! With their crunchy, creamy texture and rich chocolate coating, they’re sure to be a hit with family and friends. Plus, they’re simple to make and require just a few ingredients.