
Advertisement
The Ultimate Guide to Delicious Baked Chicken Tacos: A Crispy, Flavorful Meal in 20 Minutes!
If you’re looking for a quick, easy, and incredibly delicious meal, Baked Chicken Tacos are the perfect solution! These crispy, cheesy tacos are packed with tender chicken, melted cheese, and your favorite fillings—all baked to golden perfection. Whether you’re meal prepping for the week or serving a crowd, this recipe is a guaranteed hit.
In this comprehensive guide, we’ll cover:
✅ Why Baked Chicken Tacos are the best weeknight dinner
✅ Step-by-step instructions for perfectly crispy tacos
✅ Customizable filling ideas to suit any taste
✅ Meal prep and storage tips
✅ Nutritional benefits and smart swaps
✅ Frequently asked questions
Let’s dive in and make the crispiest, most flavorful Baked Chicken Tacos you’ve ever had!
Why Baked Chicken Tacos Are a Must-Try
Baked Chicken Tacos are a game-changer for several reasons:
✔ Faster than frying – No messy stovetop splatters! Baking gives you crispy shells with minimal effort.
✔ Healthier than traditional fried tacos – By baking instead of frying, you cut down on excess oil.
✔ Perfect for meal prep – These tacos reheat beautifully, making them ideal for lunches and quick dinners.
✔ Endlessly customizable – Swap fillings, cheeses, and toppings to suit your cravings.
Whether you’re a busy parent, a college student, or just someone who loves easy, flavorful meals, this recipe is a winner.
Ingredients for Perfect Baked Chicken Tacos
Here’s what you’ll need for 6 crispy, cheesy tacos:
Main Ingredients
- 6 extra-thin corn tortillas (Mission brand works well)
- 6 oz cooked chicken breast (shredded or chopped)
- ½ cup (56g) shredded cheddar cheese (or your favorite melting cheese)
Optional Fillings & Toppings
- Bell peppers (diced)
- Onions (sautéed for extra flavor)
- Black beans (for added protein)
- Jalapeños (for a spicy kick)
- Taco seasoning (homemade or store-bought)
- Fresh cilantro, avocado, or salsa (for serving)
Step-by-Step Instructions for Crispy Baked Chicken Tacos
Step 1: Preheat & Prep Tortillas
- Preheat oven to 400°F (200°C).
- Wrap tortillas in a damp paper towel and microwave for 45-60 seconds, flipping halfway. This makes them pliable and prevents cracking.
Step 2: Fill & Fold Tacos
- Place chicken and optional fillings on one half of each tortilla.
- Top with cheese before folding over—this helps seal the taco.
- Press gently to close. If tortillas tear, microwave them longer (15-30 sec).
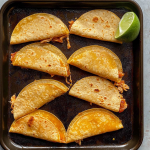
Step 3: Bake for Maximum Crispiness
- Place tacos on a baking sheet.
- Put another baking sheet on top (with a weight like a cast-iron pan) to press them down. This keeps them closed and ensures even crisping.
- Bake for 8-12 minutes until golden brown. Remove the top sheet near the end if needed for extra crispness.
Step 4: Serve & Enjoy!
- Let cool slightly before serving.
- Top with fresh cilantro, avocado, sour cream, or salsa.
Customization Ideas for Your Baked Chicken Tacos
One of the best things about Baked Chicken Tacos is how versatile they are! Here are some delicious variations:
1. Protein Swaps
- Shredded beef or pork
- Ground turkey or chorizo
- Black beans or lentils (vegetarian option)
2. Cheese Choices
- Pepper Jack (for spice)
- Monterey Jack (mild & melty)
- Queso fresco (crumbled on top after baking)
3. Flavor Boosters
- Taco seasoning (mix with chicken)
- Lime juice & cilantro (bright, fresh flavor)
- Chipotle mayo drizzle (creamy & smoky)
4. Topping Bar Ideas
Set up a DIY taco bar with:
- Pico de gallo
- Guacamole
- Pickled red onions
- Hot sauce
Why Baked Chicken Tacos Are the Best Weeknight Dinner
When it comes to quick, delicious, and family-friendly meals, Baked Chicken Tacos stand out as a top contender. Unlike traditional fried tacos, this baked version offers a crispy texture without excess oil, making them a healthier alternative. Plus, they’re incredibly easy to customize, ensuring everyone at the table gets a meal they love.
1. Faster & Easier Than Traditional Tacos
One of the biggest advantages of Baked Chicken Tacos is their simplicity. Traditional tacos often require:
- Pan-frying each shell individually (messy and time-consuming)
- Constantly monitoring to prevent burning
- Dealing with oil splatters
With baked tacos, you simply:
✅ Assemble the fillings
✅ Fold & press the tortillas
✅ Bake all at once (no flipping or babysitting required)
This method is perfect for busy weeknights when you need a meal ready in 20 minutes or less.
2. Healthier Than Fried Tacos
If you love crispy tacos but want a lighter option, baking is the way to go. Here’s why:
✔ Less oil – No deep-frying means fewer calories and less grease.
✔ Customizable macros – Use lean chicken, low-fat cheese, and whole-grain tortillas for a protein-packed, balanced meal.
✔ More veggies – Baking allows you to load up on peppers, onions, and spinach without sogginess.
3. Perfect for Meal Prep & Crowds
Whether you’re cooking for one or feeding a family, these tacos are ideal because:
- They reheat beautifully (just pop them back in the oven or air fryer).
- You can prep fillings in advance (shredded chicken, chopped veggies, etc.).
- They’re great for parties—set up a DIY taco bar with different toppings!
4. Kid-Friendly & Customizable
Kids (and picky eaters) love these tacos because:
- They’re fun to eat (crispy, handheld, and dippable).
- You can adjust fillings (mild cheese for kids, spicy jalapeños for adults).
- They’re less messy than traditional tacos (no shells breaking mid-bite).
Final Verdict:
If you want a quick, crispy, and healthy taco that’s also great for leftovers, Baked Chicken Tacos are the ultimate solution!
Step-by-Step Guide to Perfectly Crispy Baked Chicken Tacos
Making Baked Chicken Tacos is simple, but a few key steps ensure they turn out golden, crispy, and delicious every time. Follow this detailed guide for the best results!
Step 1: Preheat & Soften Tortillas
- Preheat oven to 400°F (200°C).
- Microwave tortillas (wrapped in a damp paper towel) for 45-60 seconds to make them pliable. This prevents cracking when folding.
Pro Tip: If using corn tortillas, they’re more fragile—microwave longer if they tear.
Step 2: Fill & Fold Tacos
- Layer fillings on one half of each tortilla:
- Shredded chicken (or protein of choice)
- Cheese (this acts as a “glue” to seal the taco)
- Optional: Peppers, onions, beans, or seasoning
- Fold gently and press to seal.
Troubleshooting: If tortillas crack, microwave them longer (15-30 sec).
Step 3: Bake for Maximum Crispiness
- Place tacos on a baking sheet.
- Press with a second baking sheet (or a heavy pan) to keep them flat.
- Bake for 8-12 minutes until golden and crispy.
Pro Tip: Remove the top baking sheet in the last 2-3 minutes for extra crispiness.
Step 4: Serve & Enjoy!
- Let cool slightly before serving (the cheese will set).
- Top with fresh cilantro, avocado, salsa, or sour cream.
Common Mistakes to Avoid:
❌ Overfilling (causes sogginess)
❌ Skipping the press (tacos may unfold)
❌ Baking too long (can burn quickly)
Final Thoughts:
With this foolproof method, you’ll get perfectly crispy Baked Chicken Tacos every time—no frying required!
Delicious Variations & Topping Ideas for Baked Chicken Tacos
One of the best things about Baked Chicken Tacos is how versatile they are. Whether you want spicy, cheesy, or veggie-packed, here are delicious ways to customize them!
1. Protein Variations
- Shredded Beef or Pork – Slow-cooked carnitas or barbacoa add rich flavor.
- Ground Turkey or Chorizo – A leaner option with a spicy kick.
- Black Beans & Corn – A vegetarian alternative with great texture.
- Grilled Shrimp – For a lighter, seafood twist.
2. Cheese Choices
- Pepper Jack – Adds a spicy, melty touch.
- Queso Fresco – Crumbled on top after baking for a fresh finish.
- Mexican Blend – A mix of cheddar, Monterey Jack, and asadero.
3. Flavor Boosters
- Taco Seasoning – Homemade (chili powder, cumin, garlic) or store-bought.
- Lime & Cilantro – Brightens up the flavors.
- Chipotle Mayo – Drizzle for smoky creaminess.
4. Topping Bar Ideas
Set up a DIY taco station with:
- Fresh: Pico de gallo, avocado slices, lettuce
- Creamy: Guacamole, sour cream, crema
- Spicy: Pickled jalapeños, hot sauce
- Crunchy: Radishes, cabbage slaw
Pro Tip:
- For extra crispiness, brush tortillas lightly with oil before baking.
- For gluten-free, use certified corn tortillas.
Meal Prep & Storage Tips
Baked Chicken Tacos are perfect for meal prep! Here’s how to store and reheat them:
✔ Refrigerate (up to 3 days) in an airtight container.
✔ Freeze (up to 1 month) wrapped in foil.
✔ Reheat in oven or air fryer at 400°F for 2-4 minutes until crispy.
Pro Tip: Prep fillings in advance for even faster assembly!
Nutritional Benefits & Smart Swaps
Each Baked Chicken Taco (with plain chicken & cheddar) contains:
| Nutrition Facts | Per Serving (1 taco) |
|---|---|
| Calories | 110 |
| Total Fat | 3g |
| Carbohydrates | 8g |
| Protein | 12g |
Healthier Swaps
- Use low-fat cheese to reduce calories.
- Whole wheat tortillas for extra fiber.
- Load up on veggies (spinach, zucchini) for more nutrients.
Frequently Asked Questions (FAQs)
1. Can I use flour tortillas instead of corn?
Yes! Flour tortillas work but may not get as crispy. Spray lightly with oil before baking.
2. How do I prevent soggy tacos?
- Don’t overfill.
- Press with a baking sheet while baking.
- Reheat in oven/air fryer (not microwave).
3. Can I make these vegan?
Absolutely! Use jackfruit, tofu, or beans + dairy-free cheese.
4. What’s the best dipping sauce?
- Chipotle ranch
- Avocado crema
- Salsa verde
The Ultimate Guide to Delicious Baked Chicken Tacos: A Crispy, Flavorful Meal in 20 Minutes!
Advertisement
If you’re looking for a quick, healthy, and delicious meal, Baked Chicken Tacos are the perfect solution! These tacos are crispy, packed with protein, and incredibly easy to make—ready in just 20 minutes from start to finish. Whether you’re meal prepping for the week or need a last-minute dinner idea, this recipe is a game-changer.
- Prep Time: 5 minutes
- Cook Time: 15 min
- Total Time: 20 min
Ingredients
- 6 extra-thin corn tortillas (Mission brand works well)
- 6 oz cooked chicken breast, shredded or chopped
- ½ cup (56g) shredded cheddar cheese (or your favorite cheese)
- Optional fillings: bell peppers, black beans, onions, salsa, avocado
Instructions
Step 1: Preheat & Soften Tortillas
- Preheat oven to 400°F (200°C).
- Wrap tortillas in a damp paper towel and microwave for 45-60 seconds, flipping halfway. This makes them pliable and prevents cracking.
Step 2: Fill & Fold
- Place chicken and optional fillings on one half of each tortilla.
- Sprinkle cheese on top before folding—this helps seal the taco shut.
- Gently press down to secure. (If tortillas tear, microwave them longer.)
Step 3: Bake Until Crispy
- Place tacos on a baking sheet and press another sheet on top (this keeps them flat).
- Bake for 8-12 minutes until golden and crispy.
- Pro Tip: Remove the top sheet near the end for extra crispiness!
Step 4: Serve & Enjoy!
- Serve with salsa, guacamole, or sour cream.
Notes
✅ High-Protein: Great for muscle recovery and keeping you full.
✅ Low-Carb Option: Use low-carb tortillas if preferred.
✅ Weight Watchers Friendly: Only 3 SmartPoints per taco!
Nutrition
- Calories: 110
- Fat: 3g
- Carbohydrates: 8g
- Protein: 12g
Final Thoughts: Why You’ll Love Baked Chicken Tacos
These Baked Chicken Tacos are:
🔥 Crispy without frying
⏳ Ready in 20 minutes
🍽 Perfect for meal prep
🌮 Endlessly customizable