
Advertisement
No Bake Peanut Butter Oat Cups: A Delicious and Easy Treat for Every Occasion
If you’re looking for a quick, delicious, and healthy treat that requires no baking, look no further than No Bake Peanut Butter Oat Cups. These delightful little bites combine the rich, creamy flavor of peanut butter with the wholesome goodness of oats, all topped with a smooth layer of melted chocolate. Perfect for satisfying your sweet tooth or impressing guests, these no-bake treats are a must-try for anyone who loves peanut butter and chocolate. Plus, they’re incredibly easy to make, requiring just a handful of ingredients and minimal effort. Let’s dive into the recipe, tips, and why these No Bake Peanut Butter Oat Cups are a crowd-pleaser!
Why You’ll Love No Bake Peanut Butter Oat Cups
- No Baking Required: As the name suggests, these treats require no oven time, making them perfect for hot summer days or when you’re short on time.
- Simple Ingredients: With just five main ingredients, this recipe is straightforward and uses pantry staples like peanut butter, oats, and chocolate chips.
- Customizable: You can easily adapt this recipe to suit your preferences. Add nuts, seeds, or even a sprinkle of sea salt for extra flavor.
- Healthy-ish Treat: Made with oat flour and natural sweeteners like maple syrup, these cups are a healthier alternative to store-bought desserts.
- Family-Friendly: Kids and adults alike will love these bite-sized treats. They’re perfect for lunchboxes, parties, or a quick snack.
Ingredients for No Bake Peanut Butter Oat Cups
Here’s what you’ll need to make 12 delicious No Bake Peanut Butter Oat Cups:
- 1.5 cups peanut butter: Use creamy or crunchy peanut butter, depending on your preference. For a healthier option, choose natural peanut butter with no added sugar or oils.
- 1.5 cups oat flour: You can easily make your own oat flour by processing rolled oats in a food processor until finely ground.
- 1/4 cup maple syrup: This natural sweetener adds a touch of sweetness without being overpowering. You can also use honey or agave syrup as a substitute.
- 1 cup chocolate chips: Semi-sweet or dark chocolate chips work best, but you can use milk chocolate if you prefer a sweeter taste.
- 1 tsp coconut oil (optional): Adding coconut oil to the chocolate helps it melt smoothly and creates a glossy finish.
Step-by-Step Instructions
Step 1: Prepare the Peanut Butter Oat Mixture
- In a microwave-safe bowl, combine 1.5 cups peanut butter and 1/4 cup maple syrup. Microwave for 40-60 seconds to soften the mixture.
- Stir thoroughly until the peanut butter and maple syrup are completely combined.
- Gradually add 1.5 cups oat flour to the bowl. Mix well until the mixture is thick but still moldable. If the mixture feels too dry, add a teaspoon of extra maple syrup or peanut butter to achieve the right consistency.
Step 2: Assemble the Cups
- Line a muffin pan with cupcake liners or use a silicone muffin pan for easy removal.
- Scoop the peanut butter oat mixture evenly into the muffin holes. Press down firmly with your fingers to create a compact base.
Step 3: Melt the Chocolate
- In a separate microwave-safe bowl, combine 1 cup chocolate chips and 1 tsp coconut oil.
- Microwave in 30-second increments, stirring between each session, until the chocolate is completely melted and smooth.
Step 4: Add the Chocolate Layer
- Pour a layer of melted chocolate over each peanut butter oat base.
- Use the back of a spoon to smooth the chocolate evenly.
- For an extra touch, sprinkle flaky salt, sprinkles, or mini chocolate chips on top before the chocolate hardens.
Step 5: Chill and Set
- Place the muffin pan in the refrigerator for 2-3 hours to allow the cups to set completely.
- Once set, carefully remove the cups from the pan. If using a silicone pan, they should pop out easily. For paper liners, gently peel them away.
Customizing Your No Bake Peanut Butter Oat Cups
One of the best things about No Bake Peanut Butter Oat Cups is how versatile they are. You can easily customize them to suit your taste preferences or dietary needs. Here are some creative ideas to make these treats your own:
1. Add Crunch with Nuts and Seeds
For an extra layer of texture, consider adding chopped nuts or seeds to the peanut butter mixture. Almonds, walnuts, or pecans can add a delightful crunch, while chia seeds or flaxseeds can boost the nutritional profile with omega-3 fatty acids and additional fiber.
2. Sweeten with Dried Fruit
If you have a sweet tooth, try mixing in some dried fruit like raisins, cranberries, or chopped dates. These natural sweeteners add a burst of flavor and a chewy texture that complements the creamy peanut butter and smooth chocolate.
3. Experiment with Different Nut Butters
While peanut butter is the classic choice, you can switch it up with other nut or seed butters. Almond butter, cashew butter, or even sunflower seed butter can create unique flavor profiles. Each type of butter brings its own distinct taste and nutritional benefits.
4. Go Dairy-Free or Vegan
To make these cups vegan, simply use dairy-free chocolate chips and ensure your maple syrup is vegan-friendly. You can also substitute coconut oil with another plant-based oil if needed. These small tweaks make the recipe accessible to those with dietary restrictions.
5. Add a Sprinkle of Flavor
Enhance the flavor of your cups by adding a pinch of cinnamon, a dash of vanilla extract, or a sprinkle of sea salt. These small additions can elevate the taste and make your treats even more irresistible.
With so many customization options, No Bake Peanut Butter Oat Cups can be tailored to suit any occasion or preference, making them a go-to recipe for any home cook.
Tips for Perfect No Bake Peanut Butter Oat Cups Every Time
Making No Bake Peanut Butter Oat Cups is incredibly easy, but a few tips and tricks can help ensure they turn out perfectly every time. Here’s how to master this recipe:
1. Use a Food Processor for Oat Flour
If you don’t have oat flour on hand, you can easily make your own by processing rolled oats in a food processor until finely ground. This ensures a smooth texture for your peanut butter mixture and avoids any gritty bits.
2. Adjust the Consistency
The key to perfect cups lies in the consistency of the peanut butter oat mixture. It should be thick but still moldable. If the mixture feels too dry, add a teaspoon of extra maple syrup or peanut butter. If it’s too wet, add a bit more oat flour until you reach the desired texture.
3. Use Silicone Molds for Easy Removal
While you can use a traditional muffin tin with paper liners, silicone molds make it much easier to remove the cups once they’ve set. They also eliminate the need for liners, making cleanup a breeze.
4. Melt Chocolate Carefully
When melting the chocolate, be sure to do it in short increments (30 seconds at a time) and stir well between each session. This prevents the chocolate from burning and ensures a smooth, glossy finish. Adding a teaspoon of coconut oil can help achieve a silky texture.
5. Chill Thoroughly
Patience is key when it comes to setting the cups. Allow them to chill in the refrigerator for at least 2-3 hours to ensure they firm up properly. If you’re in a hurry, you can place them in the freezer for about an hour, but be careful not to let them freeze solid.
6. Store Properly
To maintain freshness, store the cups in an airtight container in the refrigerator. They’ll keep for up to 5 days, though they’re so delicious, they probably won’t last that long!
Frequently Asked Questions
1. Can I use almond butter instead of peanut butter?
Yes, almond butter or any other nut or seed butter can be used as a substitute for peanut butter.
2. Are these cups gluten-free?
Yes, as long as you use certified gluten-free oats, these cups are gluten-free.
3. Can I make these cups vegan?
Absolutely! Use dairy-free chocolate chips and ensure your maple syrup is vegan-friendly.
4. How do I make these cups nut-free?
Replace the peanut butter with sunflower seed butter and use a nut-free chocolate option.
5. Can I skip the chocolate layer?
While the chocolate layer adds a delicious touch, you can skip it if you prefer a simpler treat.
Why No Bake Peanut Butter Oat Cups Are a Hit
These No Bake Peanut Butter Oat Cups are not only delicious but also versatile and easy to make. They’re perfect for:
- Snacking: Keep a batch in the fridge for a quick and satisfying snack.
- Dessert: Serve them at parties or family gatherings for a crowd-pleasing treat.
- Gifts: Package them in a cute box or jar for a homemade gift that everyone will love.
Nutritional Benefits
While these cups are a treat, they also offer some nutritional benefits:
- Oats: Rich in fiber and antioxidants, oats help support digestion and heart health.
- Peanut Butter: A good source of protein and healthy fats, peanut butter keeps you full and energized.
- Dark Chocolate: Packed with antioxidants, dark chocolate can improve heart health and boost mood.
No Bake Peanut Butter Oat Cups: A Delicious and Easy Treat for Every Occasion
Advertisement
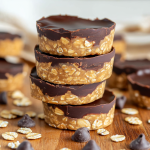
A creamy peanut butter oat layer topped with melted chocolate makes a delicious and easy treat that your whole family will love. These no-bake cups are perfect for satisfying your sweet tooth without turning on the oven! They’re gluten-free (if using certified gluten-free oats), customizable, and packed with wholesome ingredients.
- Prep Time: 10minutes
- Total Time: 10 minutes
Ingredients
- 1.5 cups peanut butter
- 1.5 cups oat flour (rolled oats processed finely in a food processor)
- 1/4 cup maple syrup
- 1 cup chocolate chips
- 1 tsp coconut oil (optional, for smoother chocolate)
Instructions
- Prepare the Peanut Butter Mixture:
- In a microwave-safe bowl, combine peanut butter and maple syrup. Microwave for 40-60 seconds, then stir until smooth and fully combined.
- Gradually add the oat flour to the peanut butter mixture, stirring well. The mixture should be thick but moldable. If it’s too dry, add a teaspoon of maple syrup or peanut butter at a time until it holds together.
- Assemble the Cups:
- Line a muffin pan with cupcake liners or use a silicone muffin pan for easy removal.
- Scoop the peanut butter oat mixture evenly into the muffin cups, pressing down firmly with your fingers to create an even layer.
- Melt the Chocolate:
- In a microwave-safe bowl, combine chocolate chips and coconut oil (if using). Microwave in 30-second intervals, stirring between each, until the chocolate is fully melted and smooth.
- Top with Chocolate:
- Pour a layer of melted chocolate over each peanut butter oat cup. Use the back of a spoon to smooth the chocolate.
- Optional: Add toppings like flaky salt, sprinkles, or mini chocolate chips before the chocolate sets.
- Chill and Serve:
- Refrigerate the cups for 2-3 hours, or until completely set.
- Carefully remove them from the muffin pan and store in an airtight container in the refrigerator for up to 5 days.
Notes
- Raw oats are generally safe to eat as they are steamed during processing. However, if you have a sensitive stomach or are at higher risk for foodborne illness, consider using toasted oats or consulting a healthcare professional.
- For a fun twist, try adding a layer of jam or banana slices between the peanut butter and chocolate layers.
Nutrition
- Calories: 250 Per Serving
- Sugar: 12g
- Fat: 16g
- Carbohydrates: 22g
- Fiber: 3g
- Protein: 7g
Conclusion
No Bake Peanut Butter Oat Cups are the perfect combination of simplicity, flavor, and nutrition. Whether you’re a seasoned baker or a beginner in the kitchen, this recipe is foolproof and guaranteed to impress. With their creamy peanut butter base, wholesome oats, and decadent chocolate topping, these cups are a treat you’ll want to make again and again. So, grab your ingredients and give this recipe a try—your taste buds will thank you!