Advertisement
How to Make a Sprinkles Easter Bunny Cake: A Fun and Festive Easter Treat
Easter is just around the corner, and what better way to celebrate than with a delightful and eye-catching Sprinkles Easter Bunny Cake? This cake is not only delicious but also incredibly fun to make, even if you’re not a professional baker. The best part? You don’t need extensive cake-decorating skills to create this adorable masterpiece. Whether you’re hosting an Easter brunch, attending a potluck, or simply want to surprise your family with a festive dessert, this Sprinkles Easter Bunny Cake is sure to be a hit.
In this step-by-step guide, we’ll walk you through everything you need to know to create your own Sprinkles Easter Bunny Cake. From baking the perfect cake to decorating it with colorful sprinkles, we’ve got you covered. So, let’s hop right into it!
Why You’ll Love This Sprinkles Easter Bunny Cake
Before we dive into the recipe, let’s talk about why this cake is so special:
- Easy to Make: No advanced baking skills required! This cake is beginner-friendly and uses simple techniques.
- Customizable: You can use any cake flavor you like—vanilla, strawberry, chocolate, or even carrot cake for a classic Easter twist.
- Festive and Fun: The bunny-shaped sprinkle design is perfect for Easter and adds a playful touch to your dessert table.
- Great for All Ages: Kids and adults alike will love this colorful and tasty treat.
Ingredients You’ll Need
To make your Sprinkles Easter Bunny Cake, gather the following ingredients:
For the Cake:
- 1 box of cake mix (or your favorite homemade cake recipe)
- Ingredients listed on the cake mix box (typically eggs, oil, and water)
- 2 round cake pans (8 or 9 inches)
For the Frosting:
- 2 cups of buttercream frosting (store-bought or homemade)
- Food coloring (optional, if you want colored frosting)
For Decorating:
- 1 Easter bunny-shaped cookie cutter
- 1 cup of colorful sprinkles (pastel colors work best for Easter)
- Additional sprinkles for the sides of the cake (optional)
Step-by-Step Instructions
Step 1: Bake the Cake
- Prepare the Cake Batter: Follow the instructions on your cake mix box or prepare your favorite homemade cake recipe. If you’re using a boxed mix, one box is enough for this cake.
- Divide the Batter: Pour the batter evenly into two greased and floured round cake pans.
- Bake the Cakes: Bake according to the recipe or box instructions. Once baked, let the cakes cool completely in the pans before removing them.
Step 2: Assemble the Cake
- Level the Cakes: If your cakes have domed tops, use a serrated knife to level them so they stack evenly.
- Stack the Cakes: Place one cake layer on a serving plate or cake stand. Spread a layer of frosting on top, then place the second cake layer on top.
- Frost the Cake: Use a spatula to frost the entire cake with a thin layer of buttercream frosting. This is called the “crumb coat” and helps seal in any crumbs. Chill the cake in the refrigerator for 15-20 minutes to set the crumb coat.
- Add the Final Frosting Layer: Once the crumb coat is set, apply a thicker layer of frosting all over the cake. Smooth it out with a spatula or leave it slightly textured for a rustic look.
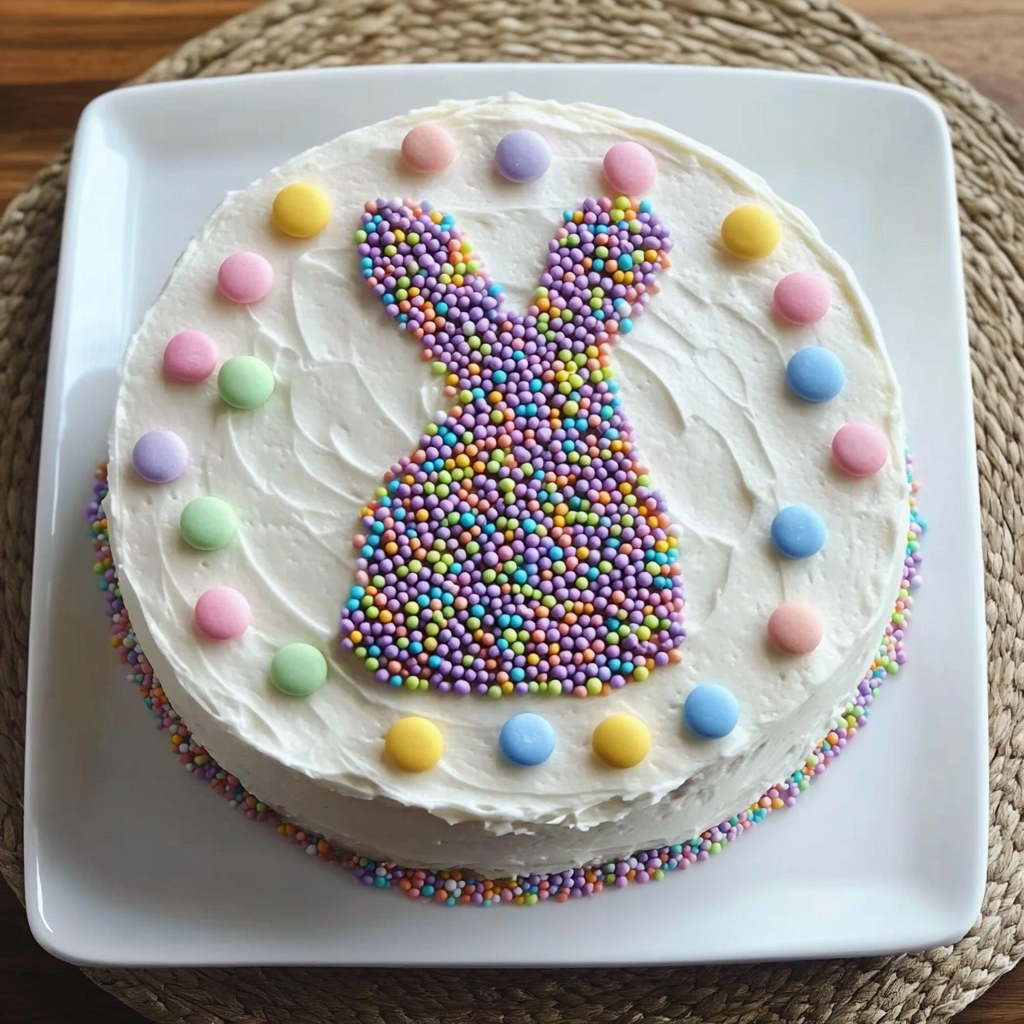
Step 3: Create the Bunny Design with Sprinkles
- Choose Your Bunny Placement: Decide where you want the bunny design to be on your cake. The center is a classic choice, but you can also create multiple bunnies if you prefer.
- Use the Cookie Cutter: Gently press the Easter bunny-shaped cookie cutter into the frosting where you want the design. Be careful not to press too hard—you want to create an outline without cutting into the cake.
- Add the Sprinkles: Carefully pour sprinkles into the cookie cutter, making sure they fill the bunny shape evenly. Use a spoon or your fingers to spread the sprinkles and press them gently into the frosting.
- Remove the Cookie Cutter: Slowly lift the cookie cutter straight up to reveal your bunny-shaped sprinkle design. If any sprinkles stick to the cutter, gently tap them back into place.
Step 4: Add Finishing Touches
- Decorate the Sides: If you’d like, you can add more sprinkles to the sides of the cake for extra color and texture.
- Add Extra Details: Use additional frosting or edible decorations to add eyes, a nose, or a bow tie to your bunny design.
- Chill the Cake: Place the cake in the refrigerator for at least 30 minutes to set the frosting and sprinkles before serving.
Choosing the Perfect Cake Flavor for Your Sprinkles Easter Bunny Cake
When it comes to making a Sprinkles Easter Bunny Cake, the flavor of the cake is just as important as the decoration. After all, a beautiful cake is only as good as it tastes! The great thing about this recipe is that it’s incredibly versatile, allowing you to choose a cake flavor that suits your preferences or fits the Easter theme. Here are some delicious options to consider:
- Classic Vanilla Cake: A timeless choice, vanilla cake is light, fluffy, and pairs perfectly with buttercream frosting. Its neutral flavor allows the sprinkles and festive design to take center stage. If you’re baking for a crowd, vanilla is a safe bet that everyone will enjoy.
- Strawberry Cake: For a fruity twist, strawberry cake is a wonderful option. The sweet, tangy flavor complements the pastel sprinkles and adds a pop of color to the cake layers. You can use fresh strawberries in the batter or opt for a strawberry cake mix for convenience.
- Carrot Cake: Carrot cake is a classic Easter dessert, and it works beautifully for this recipe. The warm spices, grated carrots, and optional nuts or raisins add depth and texture to the cake. Pair it with cream cheese frosting for a match made in heaven.
- Chocolate Cake: If you’re a chocolate lover, why not go for a rich and decadent chocolate cake? The contrast between the dark cake and colorful sprinkles creates a stunning visual effect. Plus, chocolate is always a crowd-pleaser.
- Lemon Cake: For a bright and zesty option, lemon cake is a refreshing choice. The citrusy flavor pairs well with the sweetness of the frosting and sprinkles, making it a perfect springtime dessert.
No matter which flavor you choose, make sure to bake the cake in two round pans for easy stacking. Once the cake is baked and cooled, you’re ready to move on to the fun part—decorating your Sprinkles Easter Bunny Cake!
Mastering the Art of Frosting Your Sprinkles Easter Bunny Cake
Frosting is a crucial step in creating your Sprinkles Easter Bunny Cake. Not only does it add flavor, but it also serves as the canvas for your sprinkle design. Here’s how to frost your cake like a pro:
- Choose Your Frosting: Buttercream frosting is the most popular choice for this cake because it’s easy to work with and holds sprinkles well. You can use store-bought frosting for convenience or make your own by combining butter, powdered sugar, vanilla extract, and a splash of milk.
- Apply the Crumb Coat: Before adding the final layer of frosting, it’s important to apply a crumb coat. This is a thin layer of frosting that seals in any loose crumbs and creates a smooth base for the final coat. Use a spatula to spread a thin, even layer of frosting over the entire cake, then chill it in the refrigerator for 15-20 minutes to set.
- Add the Final Frosting Layer: Once the crumb coat is set, apply a thicker layer of frosting to the cake. Use a spatula or bench scraper to smooth the frosting, or leave it slightly textured for a rustic look. If you want to get creative, you can divide the frosting into batches and tint them with food coloring for a pastel ombre effect.
- Chill the Cake Again: After applying the final layer of frosting, chill the cake in the refrigerator for another 15-20 minutes. This step ensures that the frosting is firm enough to hold the sprinkle design without smudging.
- Prepare for Decorating: Before adding the sprinkles, decide where you want the bunny design to be on the cake. Use a bunny-shaped cookie cutter to gently press an outline into the frosting. Be careful not to press too hard—you want to create a guide without cutting into the cake.
With your cake perfectly frosted, you’re ready to move on to the most exciting part—adding the sprinkles to create your Sprinkles Easter Bunny Cake!
Creative Ways to Decorate Your Sprinkles Easter Bunny Cake
Decorating your Sprinkles Easter Bunny Cake is where the magic happens. This is your chance to let your creativity shine and make a cake that’s as unique as it is delicious. Here are some fun and creative ideas to take your cake to the next level:
- Mix and Match Sprinkles: While pastel-colored sprinkles are perfect for Easter, don’t be afraid to mix and match different types of sprinkles. Try using a combination of jimmies, nonpareils, and sanding sugar for added texture and visual interest.
- Add Edible Glitter: For a touch of sparkle, sprinkle some edible glitter over the bunny design or the entire cake. This is a great way to make your cake stand out and add a festive touch.
- Create a Bunny Family: Instead of just one bunny, use multiple cookie cutters to create a family of bunnies on your cake. This is a fun idea for larger cakes or if you’re serving a big group.
- Use Fondant Accents: If you’re feeling adventurous, you can use fondant to create additional decorations like carrots, flowers, or Easter eggs. These can be placed around the bunny design or scattered across the cake for a whimsical effect.
- Pipe Details with Frosting: Use a piping bag fitted with a small round tip to add details like eyes, a nose, or a bow tie to your bunny design. You can also pipe grass or flowers around the base of the cake for a springtime vibe.
- Incorporate Fresh Flowers: For a natural and elegant touch, decorate the cake with fresh edible flowers like pansies, violets, or marigolds. Make sure the flowers are pesticide-free and safe to eat.
- Personalize with a Message: Use letter-shaped cookie cutters or a piping bag to write a festive message on the cake, such as “Happy Easter” or “Hoppy Spring.”
Frequently Asked Questions
Can I Use a Different Shape?
Absolutely! While this tutorial focuses on a bunny shape, you can use any cookie cutter shape you like. Easter eggs, chicks, or flowers would also make adorable designs.
Can I Make This Cake Ahead of Time?
Yes, you can bake and frost the cake a day in advance. Store it in the refrigerator, covered with plastic wrap. Add the sprinkles just before serving to keep them fresh and vibrant.
What If I Don’t Have a Cookie Cutter?
If you don’t have a bunny-shaped cookie cutter, you can freehand the design using a toothpick to outline the shape before adding the sprinkles.
How to Make a Sprinkles Easter Bunny Cake: A Fun and Festive Easter Treat
Advertisement
This Sprinkles Easter Bunny Cake is a fun and festive dessert that’s perfect for Easter celebrations. The best part? You don’t need to be a professional baker to create this adorable treat. With a simple cookie cutter and some colorful sprinkles, you can transform a basic cake into a delightful Easter masterpiece. Whether you’re hosting a family gathering or just want to surprise your loved ones, this cake is sure to bring smiles all around.
Ingredients
- 1 box of your favorite cake mix (or homemade cake recipe)
- Ingredients needed for the cake mix (eggs, oil, water, etc.)
- 2 cups of vanilla or cream cheese frosting (store-bought or homemade)
- 1–2 cups of colorful sprinkles (pastel colors work best for Easter)
- 1 Easter Bunny-shaped cookie cutter
Instructions
Step 1: Bake the Cake
- Preheat your oven according to the cake mix instructions.
- Prepare the cake batter as directed on the box or using your favorite recipe.
- Divide the batter evenly between two greased and floured cake pans.
- Bake according to the instructions and let the cakes cool completely on a wire rack.
Step 2: Assemble and Frost the Cake
- Once the cakes are cooled, place one layer on a serving plate or cake stand.
- Spread a layer of frosting on top of the first cake layer.
- Place the second cake layer on top and frost the entire cake with a thin crumb coat. Chill for 15-20 minutes to set.
- Apply a second, thicker layer of frosting, smoothing it out as much as possible. You can leave the edges exposed for a rustic look or cover them completely.
Step 3: Decorate with the Easter Bunny Sprinkles
- Decide where you want the bunny design to be on your cake (center, top, or multiple bunnies).
- Gently press the Easter Bunny cookie cutter into the frosting where you want the design. Be careful not to press too hard—just enough to create a clear outline.
- Fill the cookie cutter with sprinkles, shaking them gently to distribute evenly. Use a spoon or your fingers to press the sprinkles lightly into the frosting.
- Carefully lift the cookie cutter straight up to reveal your bunny-shaped sprinkle design. If any sprinkles stick to the cutter, gently tap them back into place.
Step 4: Final Touches
- If desired, add extra sprinkles around the base of the cake or on the sides for a festive touch.
- Serve and enjoy your adorable Sprinkles Easter Bunny Cake!
Notes
- Cake Flavor: Use a carrot cake recipe for a traditional Easter flavor, or stick with vanilla or strawberry for a classic taste.
- Sprinkles: Look for pastel-colored sprinkles or themed Easter sprinkles with bunnies, eggs, or flowers for extra charm.
- Cookie Cutter: If you don’t have a bunny-shaped cutter, you can use a stencil or freehand the design with a toothpick.
- Chill the Cake: For easier decorating, chill the frosted cake for 15-20 minutes before adding the sprinkles.
Nutrition
- Calories: 350 per serving
- Sugar: 42g
- Sodium: 280mg
- Fat: 12g
- Saturated Fat: 4g
- Carbohydrates: 58g
- Protein: 3g
- Cholesterol: 30mg
Final Thoughts
Making a Sprinkles Easter Bunny Cake is a fun and creative way to celebrate the holiday. With its cheerful design and delicious flavor, this cake is sure to become a new Easter tradition in your home. Whether you’re a seasoned baker or a beginner, this recipe is easy to follow and allows for plenty of customization.