Advertisement
Apple Butter Pie: A Fall Delight with a 5-Minute Filling
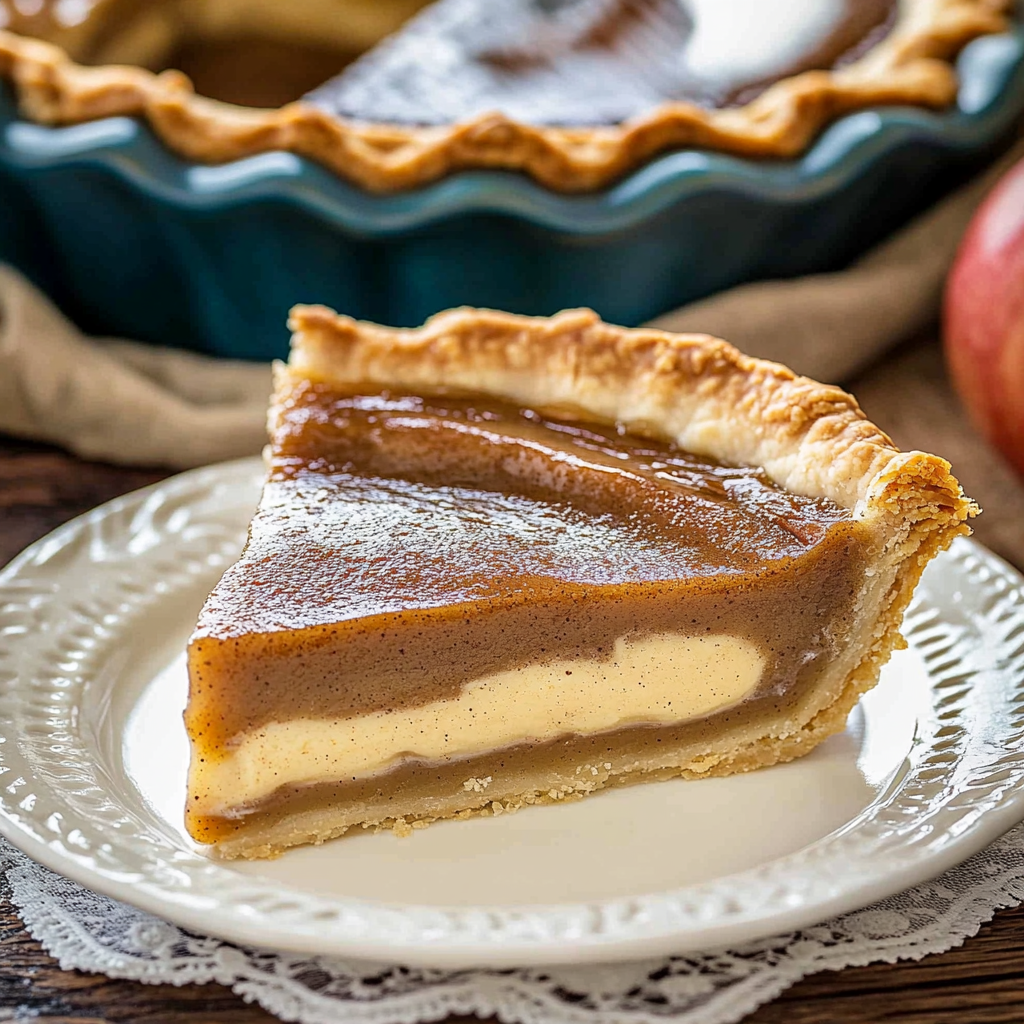
When it comes to fall desserts, nothing quite captures the essence of the season like a warm, spiced pie. If you’re a fan of pumpkin pie but want to switch things up with a unique twist, Apple Butter Pie is the perfect recipe for you. With its creamy texture and rich apple flavor, this pie is a crowd-pleaser that’s surprisingly easy to make. In this post, we’ll dive into everything you need to know about making this delicious dessert, from the ingredients and step-by-step instructions to tips for perfecting your pie. Let’s get started!
Why Apple Butter Pie?
Apple Butter Pie is a delightful fusion of the creamy texture of pumpkin pie and the warm, spiced flavor of apple butter. It’s a dessert that screams fall, with its cinnamon-infused filling and flaky crust. The best part? The filling comes together in just 5 minutes, making it a quick and easy option for holiday gatherings or cozy nights in.
This recipe has garnered a 4.44-star rating from 179 votes, proving its popularity among home bakers. Whether you’re a seasoned pie-maker or a beginner, this recipe is foolproof and guaranteed to impress.
Ingredients for Apple Butter Pie
Before we jump into the instructions, let’s take a look at the ingredients you’ll need to make this delicious pie. The recipe uses simple, pantry-friendly items, so you likely already have most of them on hand.
Ingredients:
- 2 large eggs: These provide structure and richness to the filling.
- ½ cup granulated sugar: Adds sweetness to balance the tartness of the apple butter.
- 2 tablespoons cornstarch: Helps thicken the filling for that perfect pie consistency.
- 1 teaspoon cinnamon: A warm spice that complements the apple flavor.
- ½ cup apple butter: The star ingredient! Use store-bought or homemade apple butter for a burst of fall flavor.
- 2 cups whole milk: Creates a creamy, smooth texture. For best results, use high-fat milk like whole milk, evaporated milk, or half-and-half.
- Unbaked pastry for 1 9-inch pie crust: You can use a store-bought crust or make your own from scratch.
Step-by-Step Instructions
Now that you’ve gathered your ingredients, let’s walk through the steps to create your Apple Butter Pie. Don’t worry—it’s easier than you think!
Step 1: Preheat the Oven
Start by preheating your oven to 375°F (190°C). This ensures that your oven is at the right temperature when you’re ready to bake the pie.
Step 2: Prepare the Filling
In a medium-sized bowl, beat the 2 large eggs until smooth. Add the ½ cup granulated sugar, 2 tablespoons cornstarch, 1 teaspoon cinnamon, and ½ cup apple butter. Mix well until all the ingredients are fully combined.
Step 3: Add the Milk
Gradually pour in the 2 cups of whole milk while whisking the mixture. This helps create a smooth, lump-free filling.
Step 4: Prepare the Pie Crust
Take your unbaked 9-inch pie crust and press it into a pie dish that has been lightly sprayed with cooking spray. Flute the edges of the crust for a decorative touch.
Step 5: Pour the Filling
Carefully pour the filling into the unbaked pie crust. Use a spoon to gently mix the filling once it’s in the crust to ensure all the ingredients are evenly distributed.
Step 6: Bake the Pie
Place the pie on the bottom rack of the oven and bake for 60-65 minutes. The pie is done when the center is set but still slightly jiggly. To test, insert a knife into the center—it should come out nearly clean, similar to a pumpkin pie.
Step 7: Cool and Serve
Once baked, remove the pie from the oven and let it cool on a wire rack. Resist the urge to slice into it right away, as the filling will continue to set as it cools. Once cooled, store the pie in the refrigerator.
The History of Apple Butter and Its Role in Baking
Apple butter has a rich history that dates back to colonial America. Unlike regular butter, apple butter contains no dairy. Instead, it’s a highly concentrated form of applesauce, cooked slowly with sugar and spices until it reaches a thick, spreadable consistency. The process of making apple butter was traditionally a communal activity, often taking place in large copper kettles over open fires. Families and neighbors would gather to stir the mixture for hours, adding cinnamon, cloves, and nutmeg to enhance the flavor. This labor-intensive process resulted in a product that could be stored for months, making it a staple in pantries throughout the year.
In baking, apple butter serves as a versatile ingredient that adds depth and complexity to desserts. Its concentrated apple flavor and natural sweetness make it an excellent substitute for sugar or other fruit preserves. In the case of Apple Butter Pie, it replaces the need for fresh apples, simplifying the recipe while delivering a robust, spiced apple flavor. The smooth texture of apple butter also contributes to the pie’s creamy filling, reminiscent of pumpkin pie but with a distinct apple twist. Whether you’re making pies, muffins, or cookies, apple butter is a fantastic way to infuse your baked goods with the warm, comforting flavors of fall.
Tips for Perfecting Your Pie Crust
A great pie starts with a great crust, and achieving the perfect crust can be a game-changer for your Apple Butter Pie. Here are some tips to ensure your crust is flaky, tender, and golden brown:
- Keep Ingredients Cold: The key to a flaky crust is using cold butter or shortening and ice-cold water. Cold fat creates steam as it bakes, which helps separate the layers of dough, resulting in a flaky texture.
- Don’t Overwork the Dough: Overmixing can lead to a tough crust. Mix the dough just until it comes together, and handle it as little as possible when rolling it out.
- Use a Light Touch: When pressing the dough into the pie dish, avoid pressing too hard. This can compress the layers and make the crust dense.
- Blind Bake if Necessary: If you’re concerned about a soggy bottom crust, consider blind baking (pre-baking) the crust for 10-15 minutes before adding the filling. This helps create a barrier that prevents the filling from soaking into the crust.
- Flute the Edges: Fluting the edges of the crust not only adds a decorative touch but also helps seal the filling inside. Use your fingers or a fork to create a crimped edge.
By following these tips, you’ll create a pie crust that’s the perfect complement to the creamy, spiced filling of your Apple Butter Pie.
Serving and Storing Your Apple Butter Pie
Once your Apple Butter Pie is baked to perfection, it’s time to think about serving and storing it. Here’s how to make the most of your delicious creation:
Serving Suggestions:
- Whipped Cream: A dollop of freshly whipped cream adds a light, airy contrast to the rich, spiced filling.
- Vanilla Ice Cream: For a classic à la mode experience, serve a slice of pie with a scoop of vanilla ice cream.
- Caramel Drizzle: Enhance the apple flavor by drizzling warm caramel sauce over each slice.
- Dusting of Powdered Sugar: For a simple yet elegant touch, dust the top of the pie with powdered sugar before serving.
Storing Tips:
- Refrigeration: Since the filling contains dairy, it’s important to store the pie in the refrigerator. Cover it with plastic wrap or aluminum foil to keep it fresh.
- Room Temperature: If you plan to serve the pie within a few hours, it can sit at room temperature. However, avoid leaving it out for more than 2 hours to prevent spoilage.
- Freezing: To freeze the pie, wrap it tightly in plastic wrap and aluminum foil. It can be stored in the freezer for up to 2 months. Thaw it in the refrigerator before serving.
Nutritional Information
While Apple Butter Pie is undoubtedly a treat, it’s helpful to know the nutritional breakdown. Here’s an estimate based on the recipe serving 8 slices:
- Calories: 142 kcal
- Carbohydrates: 25g
- Protein: 3g
- Fat: 3g
- Saturated Fat: 1g
- Cholesterol: 52mg
- Sodium: 46mg
- Potassium: 113mg
- Sugar: 21g
- Vitamin A: 165IU
- Vitamin C: 0.1mg
- Calcium: 81mg
- Iron: 0.3mg
Please note that these values are estimates and may vary depending on the specific brands of ingredients used.
Why You’ll Love This Recipe
- Quick and Easy: With a 5-minute filling and minimal prep time, this pie is perfect for busy bakers.
- Fall Flavors: The combination of apple butter and cinnamon captures the essence of autumn in every bite.
- Crowd-Pleaser: Whether it’s a holiday dinner or a casual get-together, this pie is sure to impress your guests.
- Versatile: You can customize the recipe with additional spices or flavorings to suit your taste.
Frequently Asked Questions
Can I Use Homemade Apple Butter?
Absolutely! If you have homemade apple butter, it will add an extra layer of flavor to the pie. Just make sure it’s smooth and well-blended.
Can I Make This Pie Ahead of Time?
Yes, you can prepare the pie a day in advance. Store it in the refrigerator and let it come to room temperature before serving.
Can I Freeze Apple Butter Pie?
While it’s best enjoyed fresh, you can freeze the pie for up to 2 months. Wrap it tightly in plastic wrap and aluminum foil before freezing. Thaw in the refrigerator before serving.
Apple Butter Pie: A Fall Delight with a 5-Minute Filling
Advertisement

Apple Butter Pie is a delightful twist on traditional fall desserts, combining the creamy texture of pumpkin pie with the rich, spiced flavor of apple butter. This recipe is quick to prepare, with a filling that takes just 5 minutes to mix, making it perfect for busy bakers. Serve it warm or chilled for a comforting treat that’s sure to impress!
- Prep Time: 5 minutes
- Cook Time: 1 hour 5 minutes
- Total Time: 1 hour 10 minutes
Ingredients
- 2 large eggs
- ½ cup granulated sugar
- 2 tablespoons cornstarch
- 1 teaspoon cinnamon
- ½ cup apple butter
- 2 cups whole milk*
- 1 unbaked 9-inch pie crust
Instructions
- Preheat the oven to 375°F (190°C).
- Prepare the filling: In a medium bowl, beat the eggs. Add the sugar, cornstarch, cinnamon, and apple butter. Mix well until smooth.
- Add milk: Gradually whisk in the milk until the mixture is fully combined.
- Prepare the crust: Press the unbaked pie crust into a 9-inch pie dish sprayed with cooking spray. Flute the edges for a decorative touch.
- Assemble the pie: Pour the filling into the pie crust. Use a spoon to gently mix the filling in the crust to ensure even distribution of ingredients.
- Bake: Place the pie on the bottom rack of the oven and bake for 60-65 minutes, or until the center is set. The pie should still have a slight jiggle in the center, but a knife inserted should come out nearly clean.
- Cool: Let the pie cool on a wire rack. It will continue to set as it cools.
- Serve: Once cooled, slice and enjoy! Store any leftovers in the refrigerator.
Notes
- Milk choice: Use whole milk, evaporated milk, or half-and-half for the best texture. Avoid skim or low-fat milk.
- Crust protection: If the edges of the crust brown too quickly, cover them with aluminum foil.
- Flavor variations: Add a pinch of salt, a dash of vanilla extract, or ½ teaspoon of apple pie spice for extra depth of flavor.
- Don’t rush slicing: Allow the pie to cool completely before cutting to ensure it sets properly.
Nutrition
- Calories: 142 kcal per serving
- Sugar: 21g
- Sodium: 46mg
- Fat: 3g
- Saturated Fat: 1g
- Carbohydrates: 25g
- Protein: 3g
- Cholesterol: 52mg
Final Thoughts
Apple Butter Pie is a must-try dessert for anyone who loves the flavors of fall. Its creamy texture, spiced filling, and flaky crust make it a standout dish that’s perfect for any occasion. Plus, with its quick and easy preparation, it’s a recipe you’ll turn to again and again.