Advertisement
Easter Blossom Cookies: A Festive and Delicious Treat for Your Easter Celebration
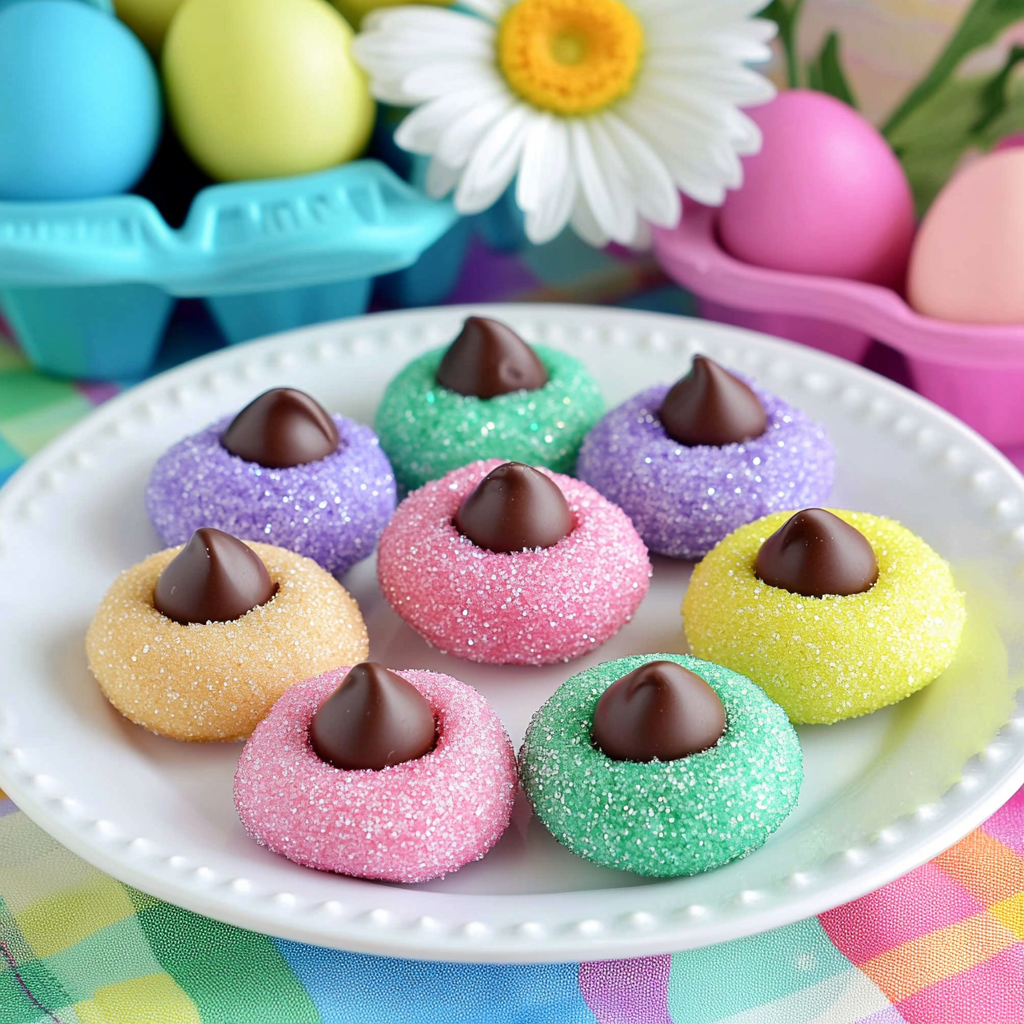
Easter is a time for joy, family gatherings, and, of course, delicious treats! If you’re looking for a fun and festive recipe to add to your Easter dessert table, look no further than these Easter Blossom Cookies. These colorful, soft, and chewy cookies are a delightful twist on the classic blossom cookies, featuring a sugar cookie base rolled in vibrant colored sugar and topped with a Hershey’s kiss. Perfect for Easter celebrations, these cookies are not only beautiful but also incredibly tasty.
In this post, we’ll walk you through everything you need to know about making these Easter Blossom Cookies, from the ingredients and step-by-step instructions to tips for perfecting the recipe. Whether you’re a seasoned baker or a beginner, this recipe is easy to follow and guaranteed to impress your family and friends.
Why You’ll Love Easter Blossom Cookies
- Festive and Fun: The colorful sugar coating and Hershey’s kiss center make these cookies a perfect addition to your Easter dessert spread.
- Easy to Make: With a total time of just 23 minutes, these cookies are quick and simple to prepare.
- Crowd-Pleasing: Both kids and adults will love the combination of a soft sugar cookie and creamy chocolate.
- Customizable: Use different colors of sugar to match your Easter theme or experiment with other chocolate candies for variety.
Ingredients for Easter Blossom Cookies
Here’s what you’ll need to make 32 delicious Easter Blossom Cookies:
- 2 cups all-purpose flour
- ¼ teaspoon baking soda
- ¼ teaspoon salt
- 1 cup granulated sugar
- ½ cup unsalted butter (room temperature)
- 1 large egg (room temperature)
- 1 ½ teaspoons vanilla extract
- 1 to 2 tablespoons milk
- Colored sugar (for rolling)
- 32 Hershey’s kisses (unwrapped)
Step-by-Step Instructions
Step 1: Preheat and Prepare
Preheat your oven to 350°F (175°C). Line your baking sheets with parchment paper or silicone baking liners to prevent sticking and set them aside.
Step 2: Mix Dry Ingredients
In a medium-sized mixing bowl, whisk together the flour, baking soda, and salt. This ensures that the dry ingredients are evenly distributed, which is key to achieving the perfect cookie texture.
Step 3: Cream Butter and Sugar
In a separate large mixing bowl, cream together the butter and granulated sugar until the mixture is light and fluffy. This step is crucial for creating a soft and chewy cookie base.
Step 4: Add Wet Ingredients
Add the egg and vanilla extract to the butter-sugar mixture, beating until well combined. The egg helps bind the ingredients, while the vanilla adds a lovely flavor.
Step 5: Combine Wet and Dry Ingredients
With your mixer on low speed, gradually add the dry ingredients to the wet mixture. Mix until just combined to avoid overworking the dough.
Step 6: Add Milk
Stream in the milk, adding just enough to soften the dough. The dough should be soft but not sticky.
Step 7: Shape the Cookies
Use a cookie scoop or tablespoon to portion the dough, then roll each portion into a ball using your hands. Roll each ball in colored sugar to coat it evenly. Place the balls about 2 inches apart on the prepared baking sheets.
Step 8: Bake
Bake the cookies for 8-10 minutes or until they are puffed and the edges are just set. Be careful not to overbake them, as they should not brown.
Step 9: Add Hershey’s Kisses
Allow the cookies to cool for 2 minutes, then gently press a Hershey’s kiss into the center of each cookie. The warmth of the cookies will slightly melt the chocolate, creating a perfect bond.
Step 10: Cool and Serve
Let the cookies cool for an additional 5 minutes on the baking sheet before transferring them to a wire rack to cool completely. Once cooled, they’re ready to serve!
The History and Significance of Blossom Cookies
Blossom cookies, also known as thumbprint cookies, have a rich history that dates back to the early 20th century. These cookies are characterized by their distinctive shape, which is created by pressing a thumb or the back of a spoon into the center of the dough before baking. The indentation is often filled with jam, chocolate, or other sweet fillings, making them a versatile and beloved treat.
The origins of blossom cookies are somewhat debated, but they are widely believed to have been inspired by Swedish hallongrottor (raspberry caves) or German spitzbuben (jam-filled cookies). Over time, the recipe evolved, and in the United States, the addition of Hershey’s kisses in the 20th century gave rise to the modern blossom cookie. These cookies became especially popular during holidays like Christmas and Easter, thanks to their festive appearance and delicious flavor.
The Easter Blossom Cookies featured in this recipe are a seasonal twist on the classic blossom cookie. By rolling the dough in colorful sugar and topping it with a Hershey’s kiss, these cookies capture the joy and vibrancy of Easter. The combination of a soft, chewy sugar cookie and creamy chocolate makes them a crowd-pleaser for all ages. Whether you’re baking them for a family gathering, an Easter egg hunt, or as a gift for friends, these cookies are sure to bring a smile to everyone’s face.
Tips for Baking Perfect Easter Blossom Cookies
Baking the perfect Easter Blossom Cookies requires attention to detail and a few expert tips. Here’s how to ensure your cookies turn out soft, chewy, and visually stunning every time:
- Use Room Temperature Ingredients: Make sure your butter and egg are at room temperature before you start. This helps the ingredients blend smoothly, resulting in a uniform dough.
- Don’t Overmix the Dough: Overmixing can lead to tough cookies. Mix the dough just until the ingredients are combined to maintain a soft and tender texture.
- Roll Evenly in Colored Sugar: For a vibrant and festive look, roll each dough ball thoroughly in colored sugar. You can use pastel colors like pink, yellow, and green to match the Easter theme.
- Watch the Baking Time: These cookies bake quickly, so keep a close eye on them. They’re done when they puff up and the edges are set but not browned. Overbaking can result in dry cookies.
- Press Hershey’s Kisses Gently: After baking, let the cookies cool for 2 minutes before pressing a Hershey’s kiss into the center. Press gently to avoid cracking the cookies.
- Unwrap Kisses in Advance: Unwrapping the Hershey’s kisses ahead of time saves you from scrambling during the baking process.
By following these tips, you’ll create Easter Blossom Cookies that are not only delicious but also picture-perfect for your Easter celebration.
Creative Variations for Easter Blossom Cookies
While the classic Easter Blossom Cookies recipe is a crowd favorite, there are plenty of ways to get creative and customize these treats to suit your preferences. Here are some fun and festive variations to try:
- Different Chocolate Toppings: Swap out the Hershey’s kisses for other chocolate candies like Rolos, Reese’s Peanut Butter Cups, or mini Easter-themed chocolates. You can also use white chocolate or dark chocolate kisses for a different flavor profile.
- Flavored Sugars: Add a twist to the colored sugar by mixing in a bit of flavored extract. For example, add a drop of almond or lemon extract to the sugar for a subtle flavor boost.
- Cookie Dough Add-Ins: Enhance the cookie dough by adding a teaspoon of citrus zest (like orange or lemon) or a pinch of cinnamon for a unique flavor.
- Gluten-Free Option: Replace the all-purpose flour with a gluten-free flour blend to make these cookies suitable for those with dietary restrictions.
- Vegan Version: Use plant-based butter, a flax egg (1 tablespoon ground flaxseed mixed with 3 tablespoons water), and dairy-free chocolate to create a vegan-friendly version of these cookies.
- Mini Cookies: For bite-sized treats, use a smaller cookie scoop and mini Hershey’s kisses. These are perfect for Easter parties or as part of a dessert platter.
Nutritional Information
Here’s the nutritional breakdown per serving (1 cookie):
- Calories: 110 kcal
- Carbohydrates: 16g
- Protein: 1g
- Fat: 5g
- Saturated Fat: 3g
- Cholesterol: 15mg
- Sodium: 25mg
- Sugar: 10g
Frequently Asked Questions
Can I Use Different Chocolate Candies?
Absolutely! While Hershey’s kisses are traditional, you can experiment with other chocolate candies like Rolos, Reese’s Peanut Butter Cups, or even mini Easter-themed chocolates.
Can I Make the Dough Ahead of Time?
Yes, you can prepare the dough in advance and store it in the refrigerator for up to 2 days. Just let it come to room temperature before shaping and baking.
How Do I Prevent the Cookies from Spreading?
Make sure your butter is at room temperature, not melted. Also, avoid overmixing the dough, as this can cause the cookies to spread too much.
Easter Blossom Cookies: A Festive and Delicious Treat for Your Easter Celebration
Advertisement

Easter Blossom Cookies are a delightful and festive treat perfect for the spring season! These soft, chewy sugar cookies are rolled in colorful sugar and topped with a Hershey’s kiss, making them as fun to make as they are to eat. They’re a great addition to your Easter dessert table or as a sweet gift for friends and family. Follow these simple steps to create these cheerful cookies, and don’t forget the tips for perfect results every time!
- Prep Time: 15 min
- Cook Time: 8 min
- Total Time: 23 min
Ingredients
- 2 cups all-purpose flour
- ¼ teaspoon baking soda
- ¼ teaspoon salt
- 1 cup granulated sugar
- ½ cup unsalted butter (room temperature)
- 1 large egg (room temperature)
- 1 ½ teaspoons vanilla extract
- 1–2 tablespoons milk
- ½ cup colored sugar (for rolling)
- 32 Hershey’s kisses (unwrapped)
Instructions
- Preheat the Oven: Preheat your oven to 350°F (175°C). Line baking sheets with parchment paper or silicone baking liners and set aside.
- Mix Dry Ingredients: In a medium-sized mixing bowl, whisk together the flour, baking soda, and salt. Set aside.
- Cream Butter and Sugar: In a large mixing bowl, cream together the butter and sugar until light and fluffy. Add the egg and vanilla extract, and beat until fully combined.
- Combine Wet and Dry Ingredients: With the mixer on low speed, gradually add the flour mixture to the butter mixture. Beat until just combined. Stream in the milk, adding just enough to soften the dough.
- Shape the Cookies: Use a cookie scoop or tablespoon to portion the dough, then roll each portion into a ball using your hands. Roll each ball in the colored sugar until fully coated. Place the balls 2 inches apart on the prepared baking sheets.
- Bake: Bake for 8–10 minutes, or until the cookies are puffed and the edges are set but not browned.
- Add Hershey’s Kisses: Allow the cookies to cool for 2 minutes, then gently press a Hershey’s kiss into the center of each cookie. Let them cool for an additional 5 minutes before transferring to a wire rack to cool completely.
Notes
- Avoid Overbaking: These cookies should puff slightly and mattify in the oven but not brown. Overbaking will make them dry.
- Prep Hershey’s Kisses Ahead: Unwrap the Hershey’s kisses before starting to save time.
- Don’t Panic About Melting: The Hershey’s kisses will look like they’re melting when pressed into the warm cookies, but they’ll quickly cool and solidify into the proper shape.
- Storage: Store the cookies in an airtight container at room temperature for up to 1 week, in the fridge for up to 3 weeks, or freeze them. Note that freezing may cause the chocolate to “bloom” (develop a white coating), which is harmless but less visually appealing.
Nutrition
- Serving Size: 1 cookie
- Calories: 110 kcal
- Sugar: 10g
- Sodium: 30mg
- Fat: 5g
- Saturated Fat: 3g
- Carbohydrates: 16g
- Protein: 1g
- Cholesterol: 15mg
Final Thoughts
These Easter Blossom Cookies are a delightful way to celebrate the season. They’re easy to make, visually stunning, and absolutely delicious. Whether you’re hosting an Easter brunch, attending a potluck, or simply looking for a fun baking project with the kids, these cookies are sure to be a hit.